
DMX Lighting Config
Thorium has support for DMX lighting control built-in. It is easy to configure, expressive enough for complicated setups, and provides manual-control for fine-grained control. This makes it really easy to get set up for simple use-cases, but powerful enough for even the largest starships.
What is DMX?
DMX is a lighting and show-control protocol that allows you to control lights, smoke machines, and other effect devices using computer signals. DMX compatible devices have one or more channels which correspond to different features of the light. Channels can be at any intensity from 0% to 100%. (The actual channel values are encoded from 0 to 255).
The simplest DMX device has a single channel. This could be a single-color light or a smoke machine.
A slightly more complicated DMX device could have three channels, one for red, one for blue, and one for green. These three channels can be set independently, allowing for a full range of colors to be shown by the light.
An even more complicated DMX device might have three color channels, an intensity channel, channels for white, amber, and ultra-violet light, and a channel for a strobe effect.
Each DMX fixture in a set is one of those DMX devices. A fixture has a starting channel number, which is a number between 1 and 512. This allows the fixture to be independently addressed so different lights can be set differently.
A DMX fixture which is a device with three RGB channels with a starting channel of 5 would have it's red channel at 5, the green channel at 6, and the blue channel at 7.
For a DMX message to be sent from a computer to lights, it has to go through a controller. There are a number of DMX controllers out there, including ENTTEC USB Pro, ARTNET, and sACN (e1.31). USB controllers require a USB connection to a computer; ARTNET and sACN operate over the network and only require the controller to be on the same network subnet as the computer.
Since DMX only allows 512 channels, it also allows for multiple sets of 512 channels to be used simultaneously. Each channel set is called a universe. Some DMX Controllers have support for multiple universes running on the same controller.
Thorium's DMX allow these things to be configured. You can do this from the "DMX" link in the settings sidebar.
Devices
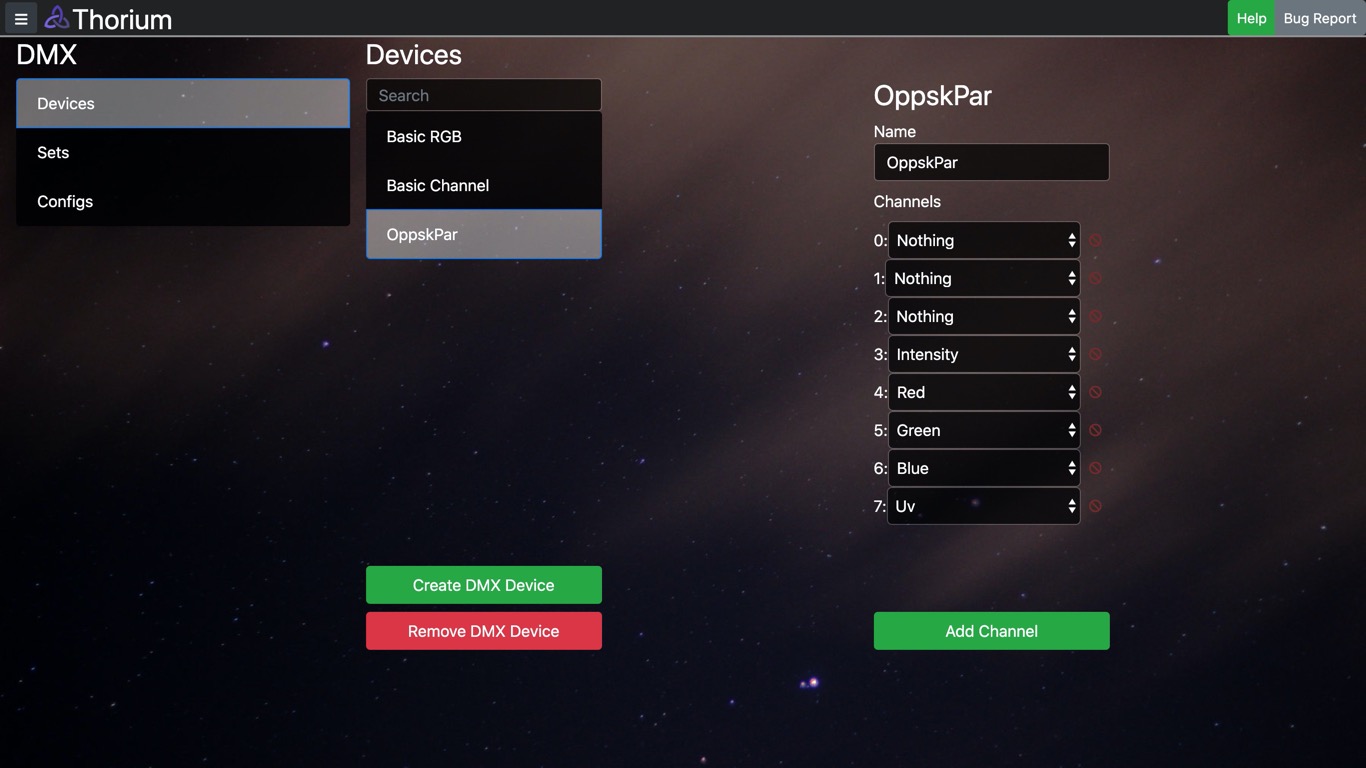
Thorium ships with a few basic DMX Device configurations built in. If you use a DMX device that doesn't exist in Thorium, you can configure it yourself.
Create the DMX Device, name it, and then add as many channels as that DMX device supports. You'll notice in the channels list that the first three channels are set to "nothing". This is because these channels aren't useful for our purposes, but we want to make sure DMX values aren't sent to those channels so the device doesn't malfunction.
Possible channel value types include:
- Red
- Green
- Blue
- Amber
- White
- UV (Ultra-Violet)
- Intensity
- Strobe
- Generic - use this for smoke machines and other generic DMX devices
- Nothing
If you have a DMX device with other DMX channel value types, file an issue to get those added.
Sets and Fixtures
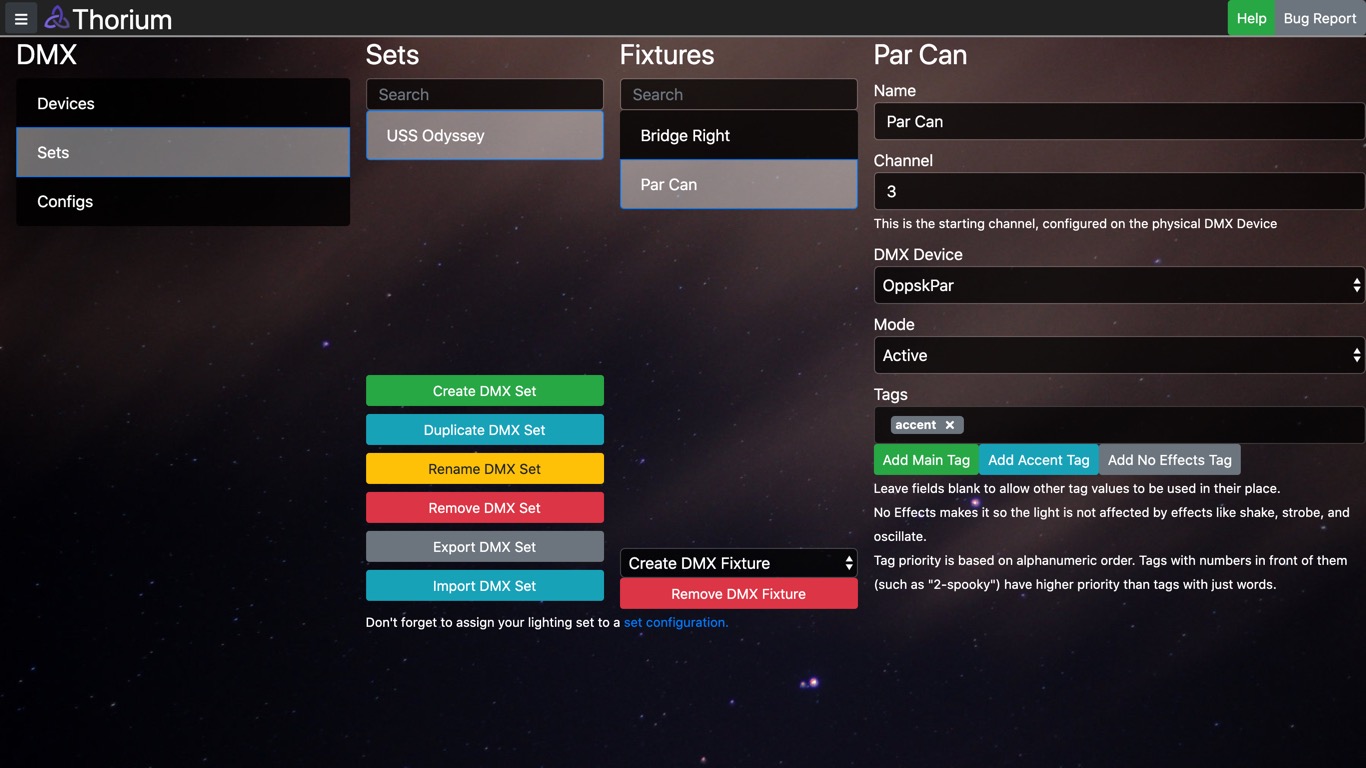
Once our DMX Device definitions are done, we can create a set and put fixtures into that set. The set represents the literal physical space where the lights are; each fixture represents an individual DMX light. DMX Sets can be duplicated, imported, and exported. When you export a DMX set, it also exports all of the DMX fixture definitions in that set.
In the image above, we've created a DMX set for our simulator, the USS Voyager. It has two fixtures: Bridge right, and Par Can. When you create a new DMX fixture, you must choose the DMX device of that fixture from the dropdown.
When configuring the fixture, you can provide a name, the starting channel of the DMX fixture. This corresponds to the channel you set on the physical fixture. You can change the DMX device if necessary as well.
DMX fixtures can be in one of two modes: Active and Passive.
Active fixtures will automatically respond to changes in the lighting control core and the simulation, for example changing to red when the alert condition changes.
Passive fixtures only change when explicitly told to, usually through macros/timeline actions. An example includes performing a specific kind of animation in a specific place as part of a timeline action, and then reverting back to active mode. Another example is having a brig forcefield light which is activated and deactivated by an RFID reader which triggers a macro that adjusts the lights.
For most users, almost all of your fixtures should be set to active mode. Passive mode should only be used for fixtures that should be manually controlled, like the brig forcefield or a smoke machine.
DMX fixtures can also be assigned tags, which can be used in macros/timeline actions to target specific groups of DMXFixtures while making changes to them. Two tags are built in: "main", which should be used for primary lighting that stays white most of the time; and "accent", which should be used for lighting that responds to changes to the alert condition. These special roles determine how the lights respond while in “active” mode and cover most use-cases for differentiating different types of lights. However, you can add whatever kinds of tags you might need for your individual setup. For example, special kinds of fixtures, like smoke machines or force fields, should have their own unique tags so you can activate them with macros.
The final special tag is "no-effects". This make it so the light won't respond to lighting effects, like shake, strobe, oscillate, or fade.
Configs
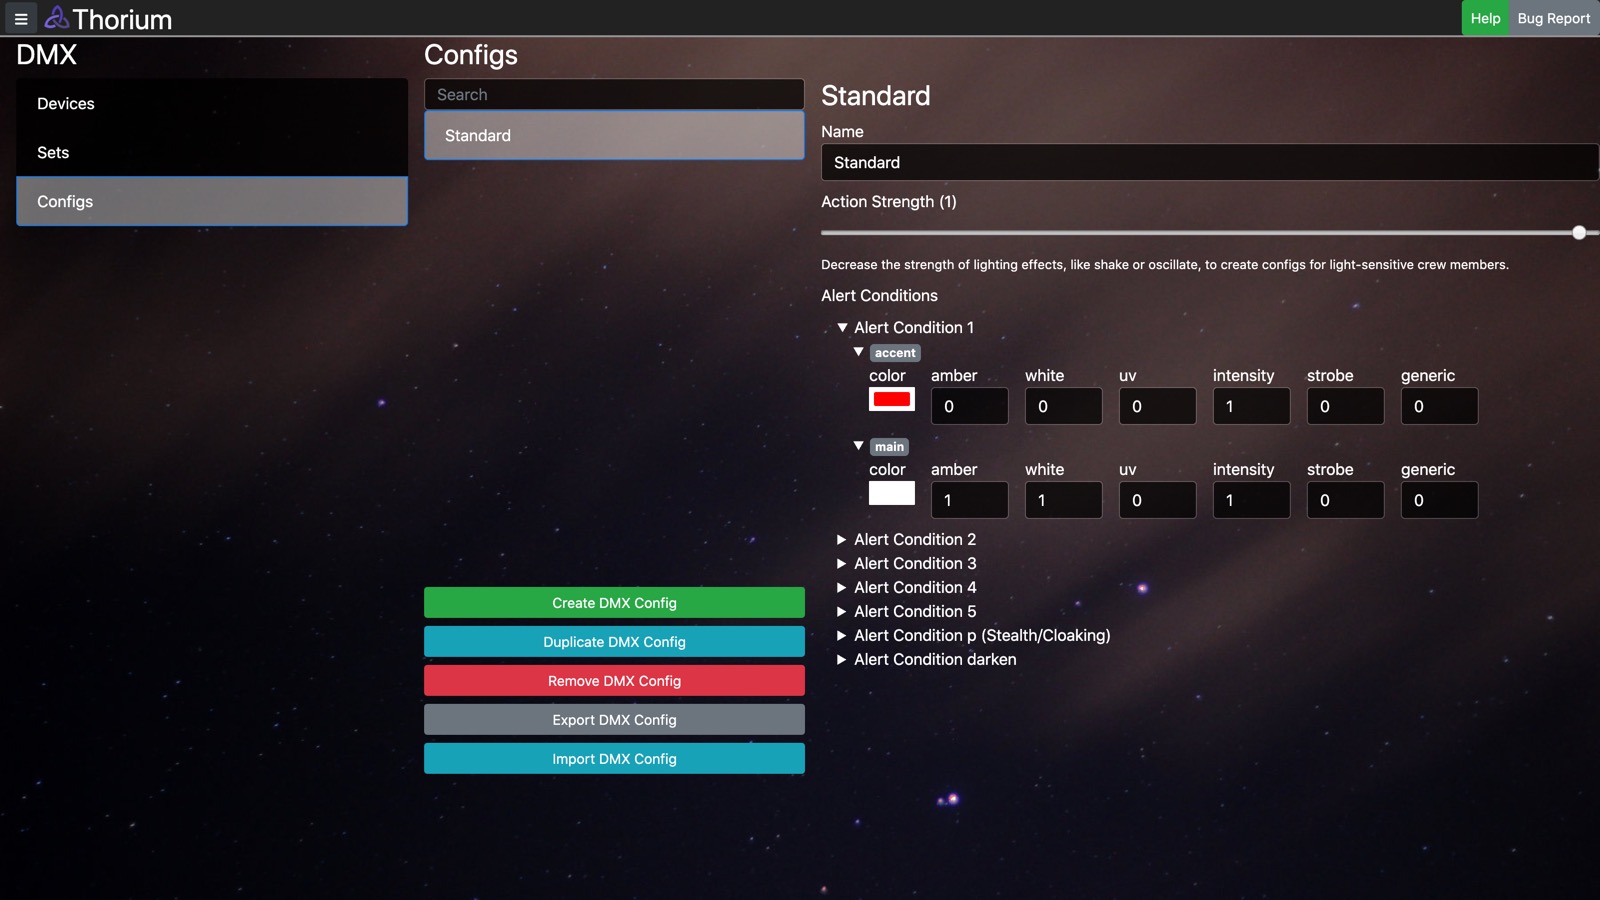
DMX Configs allow you to control how your fixtures behave under certain circumstance. Currently, the only circumstances that can be configured are alert conditions. If you have an idea for other times you want your lights to automatically change, file an issue and it can be added.
Configs are named, and allow you to set the channel values for your fixtures that have certain tags. You can set different settings for each alert condition. For example, you can set the "accent" lights' color to red when at Alert Condition 1, and blue at Alert Condition 5. And you can keep your "main" lights white at all alert conditions. You can even turn all your lights off except for the ultra-violet lights while the ship is cloaked or stealthed (Alert Condition p). There is also a special "alert condition" which is only used for when the lights should be totally dark without turning all the lights of.
Then, during your flight, when at Alert Condition 1, your "accent" tagged lights will be red, while your "main" tagged lights will be white. The lights will automatically change based on the alert condition based on how you configured it.
Of course, this only applied to "active" mode lights; passive mode lights are not affected by configs.
Configs also allow you to set an "Action Strength" which is the maximum strength an effect, like shake or oscillate, can have. You can use this to create a config for light-sensitive crew members.
Configs can be changed mid-flight with a macro, so feel free to create multiple configs for your different needs.
Configs can be duplicated, exported, and imported.
Assigning Lighting Clients
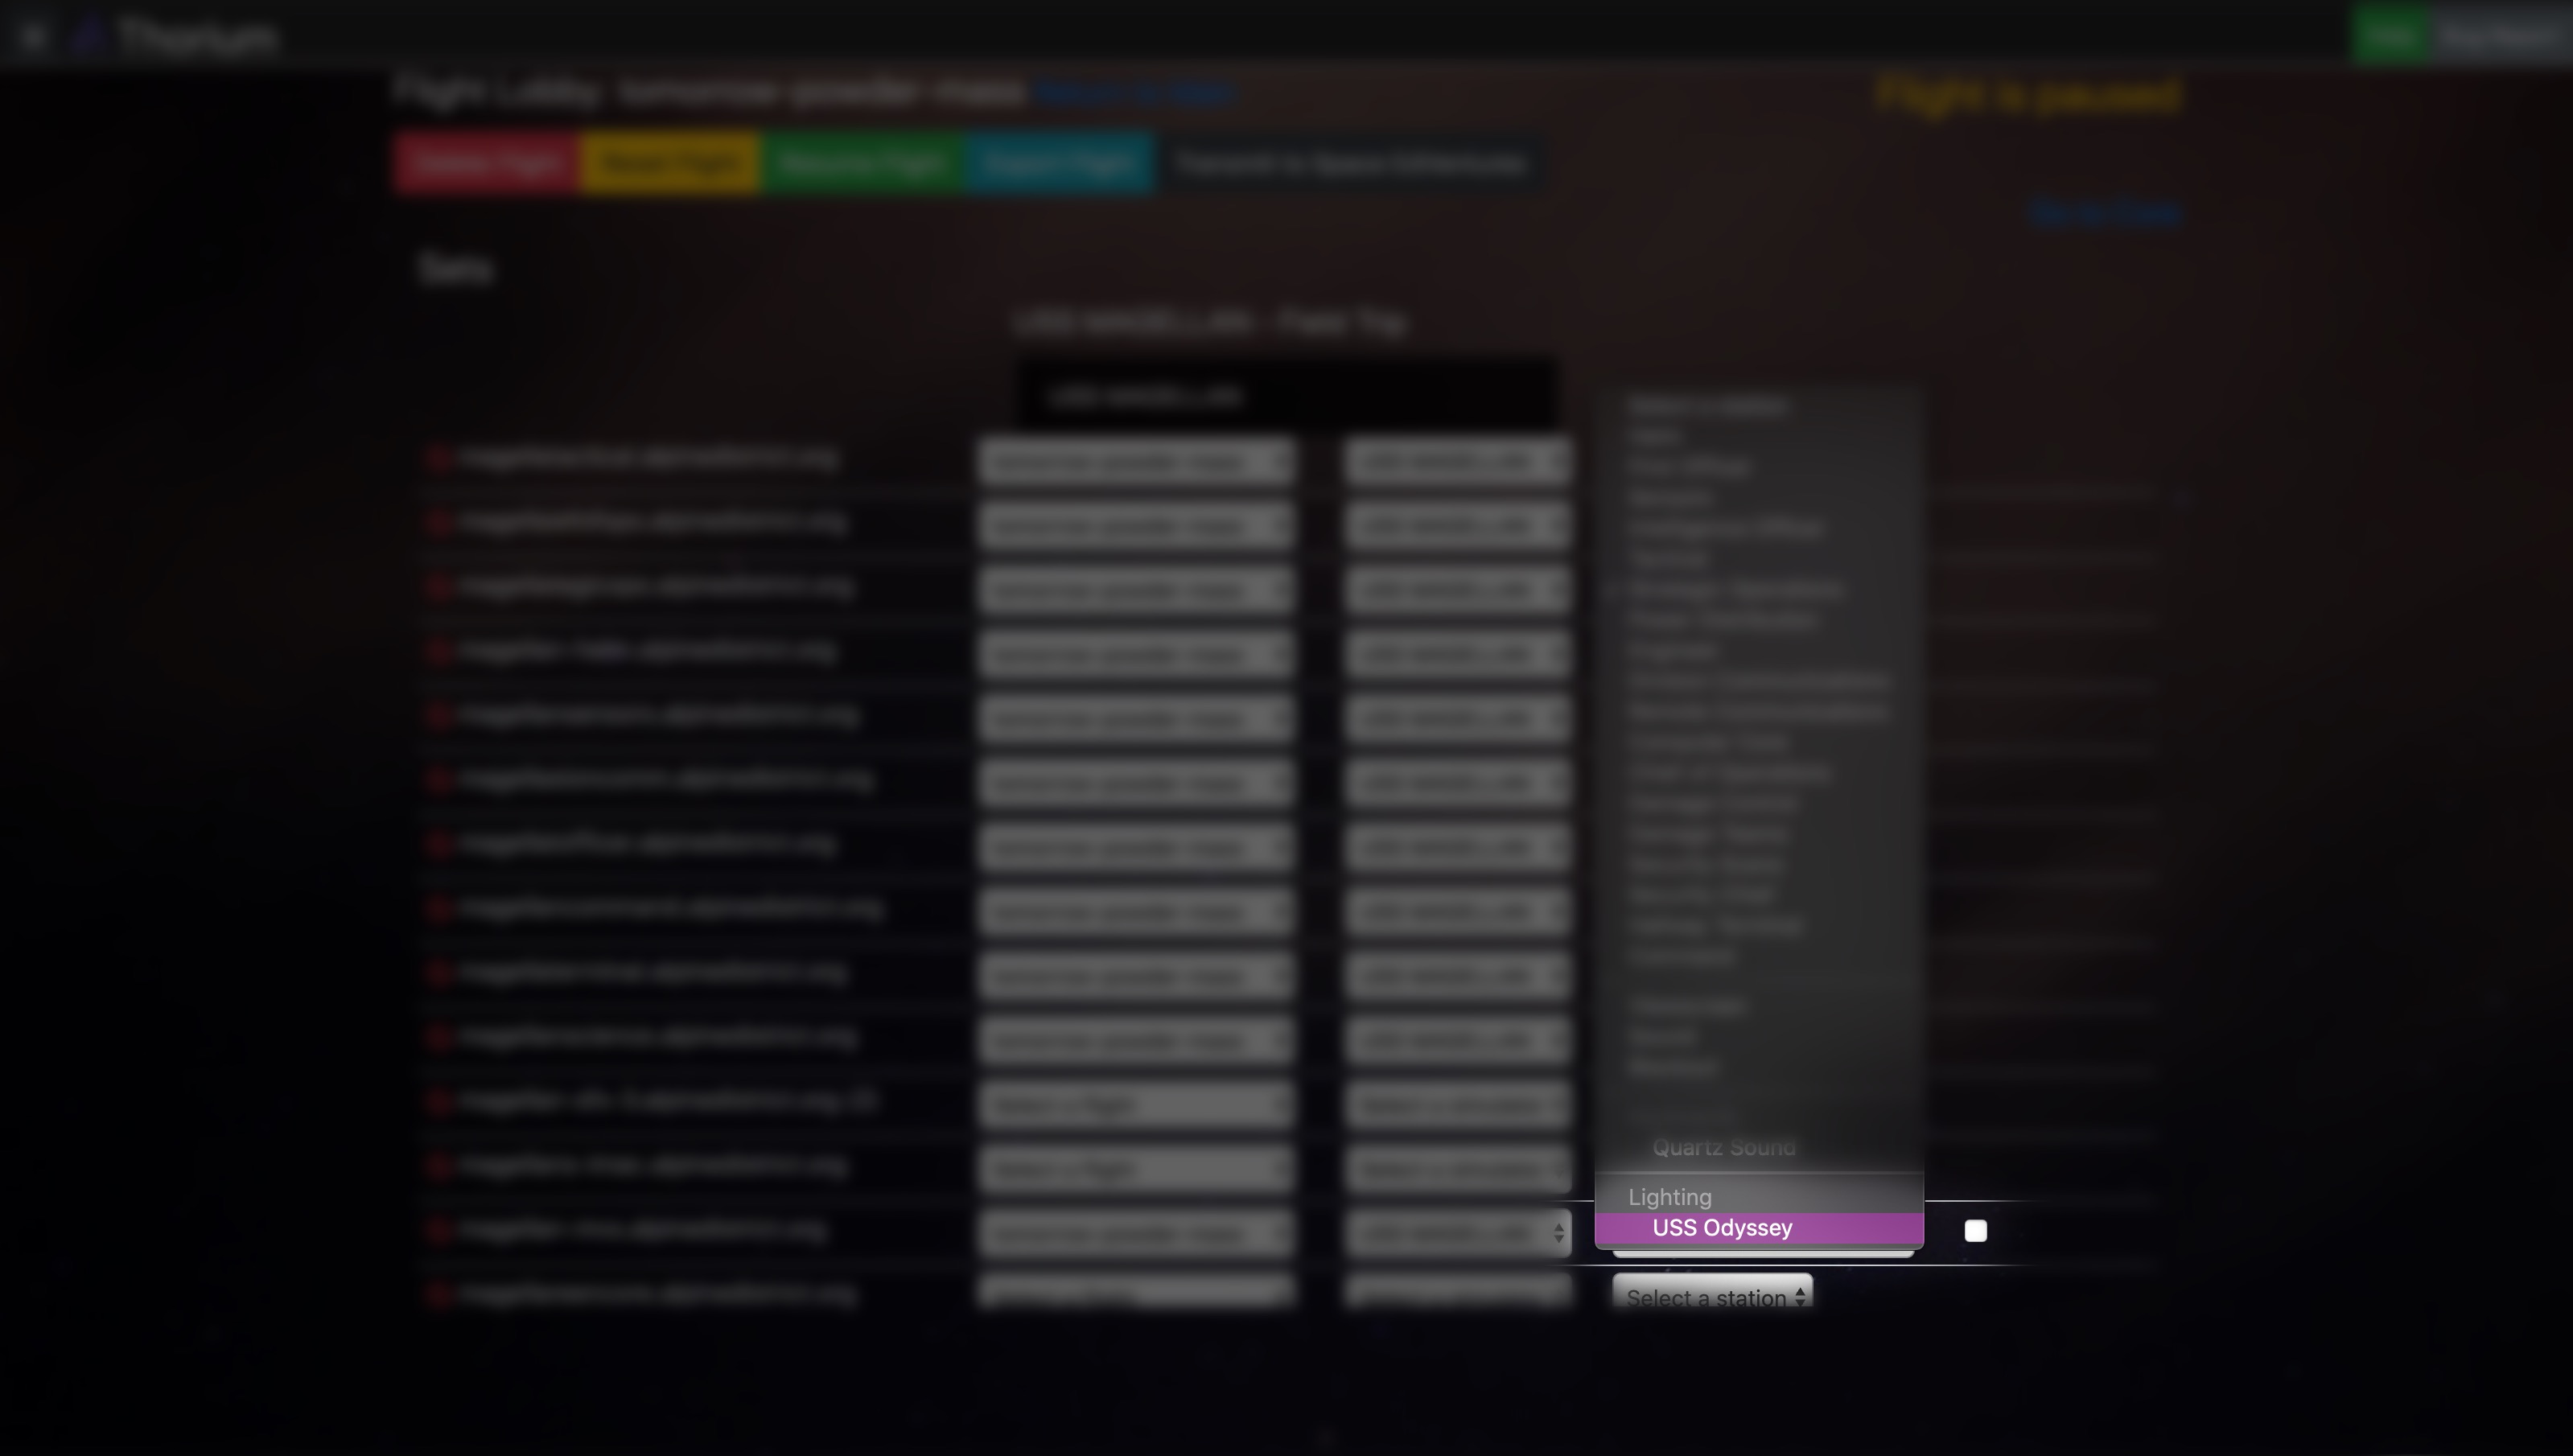
Once you start a flight, you need to assign your lighting set (the one with all the fixtures) to the client you want to control those fixtures. This is done like Keyboards. On the client configuration screen, just choose the lighting set you want from the list of stations. This can easily be configured on a Client Set as well.
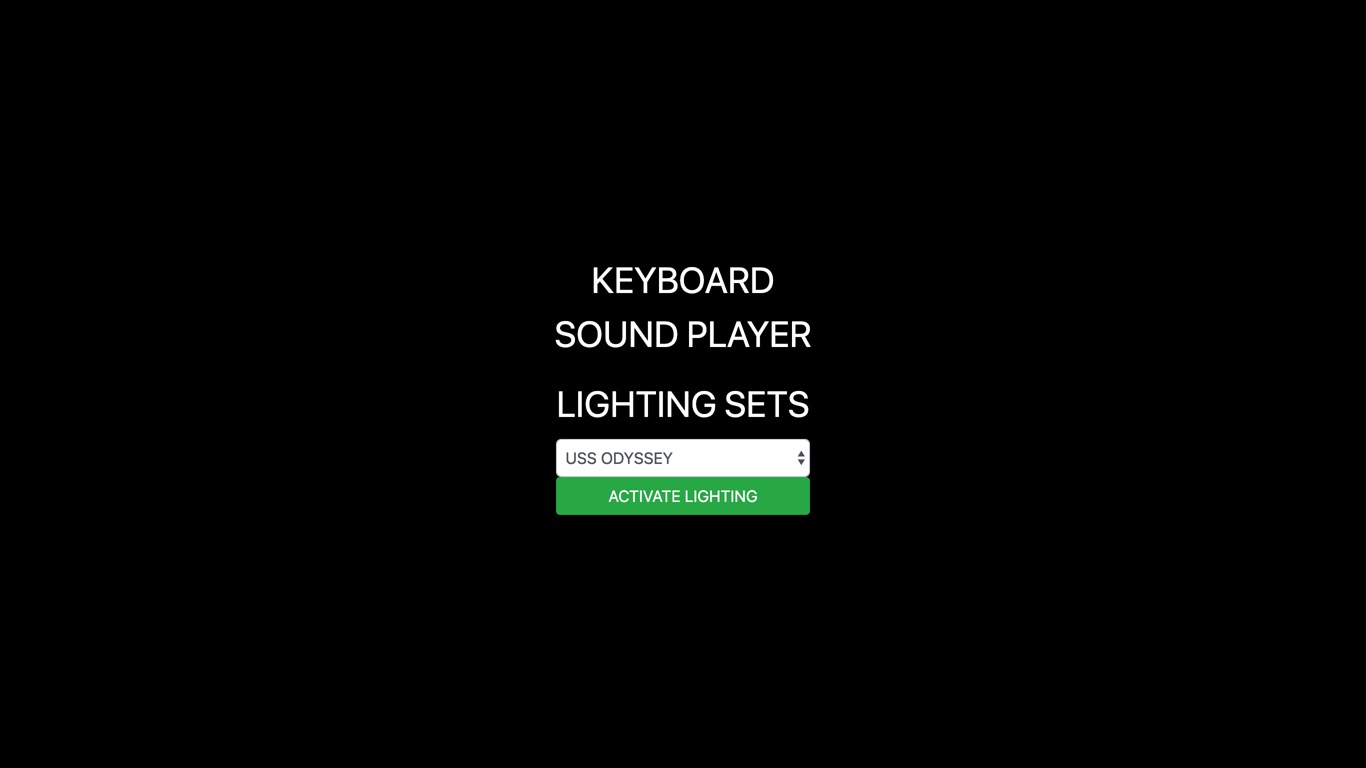
Alternatively, you can use lighting on any Keyboard or Sound Player client. If you have a DMX set configured, you can choose it from the list which appears on the Keyboard or Sound Player client, and then activate the lighting. This can help reduce the number of computers you need for your simulation. If you choose to do lighting through a Keyboard or Sound Player client, the lighting set you choose will be remembered by the client, so you don't have to pick it every time.
On Kiosk clients, it can automatically activate your lighting too!
Finally, you don't have to run the Lighting client in the foreground; it works just fine in the background. So you can run the client in a separate window and run the core or crew stations in the foreground.
Lighting Core

The lighting core is built into Next Core and is available as a core on Dynamic core. These controls affect the lighting configuration of the entire ship.
The mode lets you set the current mode of the ship. Modes include.
- Normal - Regular lighting based on configs.
- Darken - Lights are dimmed. Passive lights aren't affected.
- Blackout - All lights are turned off, including passive lights.
- Work - All lights are turned on. This only affects lighting channels, like red, green, blue, amber, white, uv, and intensity. Properly configured smoke machines aren't affected.
- Fade - Smoothly transitions light intensity.
- Oscillate - Pulses the lights with a sine wave.
- Strobe - Flashes the light on and off.
- Shake - Shakes the lights, such as during explosions.
Below that is where you can change the current config.
The buttons below that allow you to quickly change between Normal, Darken, Blackout, and Work modes.
Effect strength changes how Oscillate, Strobe, and Shake work. Low strength only makes the light intensity change a little bit; high strength makes the light intensity change a lot.
The Fade Up and Fade Down buttons fade the lights up to 100% intensity or down to 0% intensity respectively based on the current duration value.
The intensity slider changes the intensity of all active lights.
The duration slider changes the cycle period of Oscillate and Strobe effects and sets how long fades last.
The shake buttons shake the lights for 5 seconds (Short) or 15 seconds (Long).
All of these settings can be changed with the Lighting macros.
Assigning a Client and Starting the Controller
Once you've started your flight, you can assign any client to serve as your DMX controller. Just choose the lighting set from the station dropdown. You must be aware of a few things though.
- If you are running Thorium in a browser, and not using the Thorium Kiosk, the browser must be Google Chrome. You also must use HTTPS when running your server.
- If you are using Thorium Kiosk as your client, you can use a number of different USB and network-based controllers.
- If you are using a USB controller, it must be plugged into the computer which is running your lighting client.
- If you are using a network-based controller, such as an ARTNET or sACN controller, make sure the computer running your lighting client is on the same network subnet as the controller.
- Thorium supports multiple universe numbers from different computers running lighting clients. It sets the universe value to 1 by default.
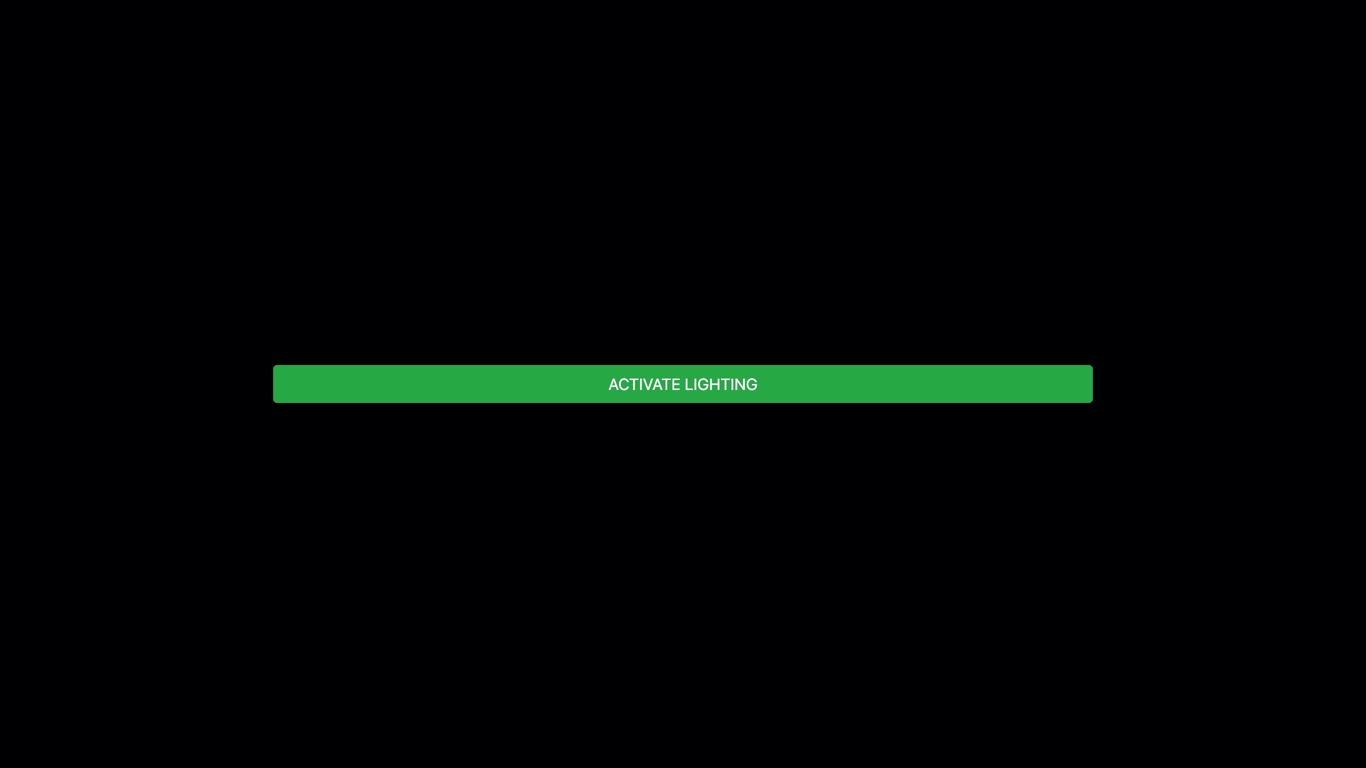
If you are using a plain browser, just click the green "Activate" button. A dropdown will appear asking which device you want to use.
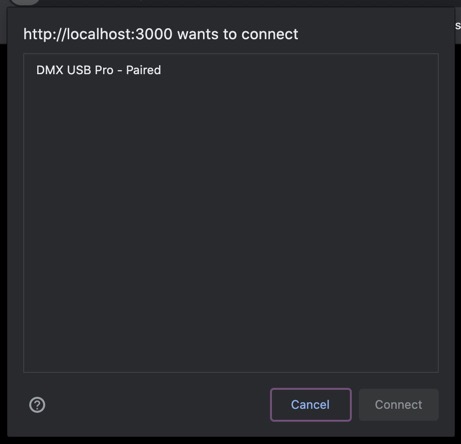
Only compatible DMX controllers will appear in that list; if your device doesn't appear, file an issue.
Once the device has been selected, the lighting controls will appear and the lights should start responding.
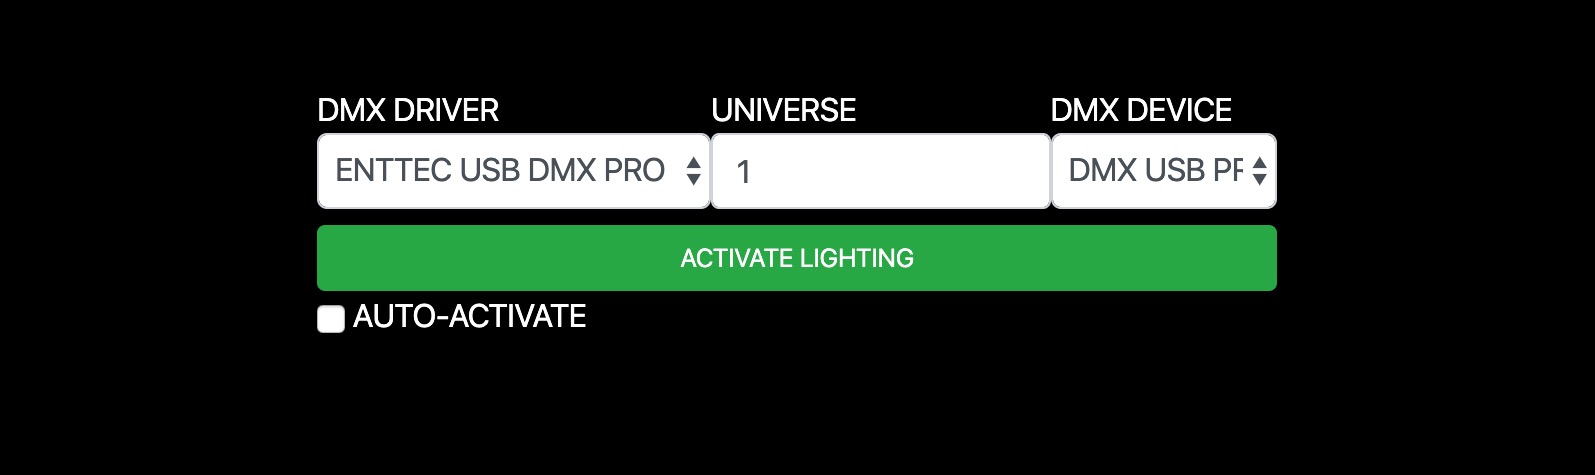
If you are using the Thorium Kiosk, you'll need to do a bit of configuration.
The right dropdown lets you choose what kind of controller you are using. The top controllers are USB based and you must have a USB controller plugged into the computer before trying to configure it. The available controllers are shown on the right side.
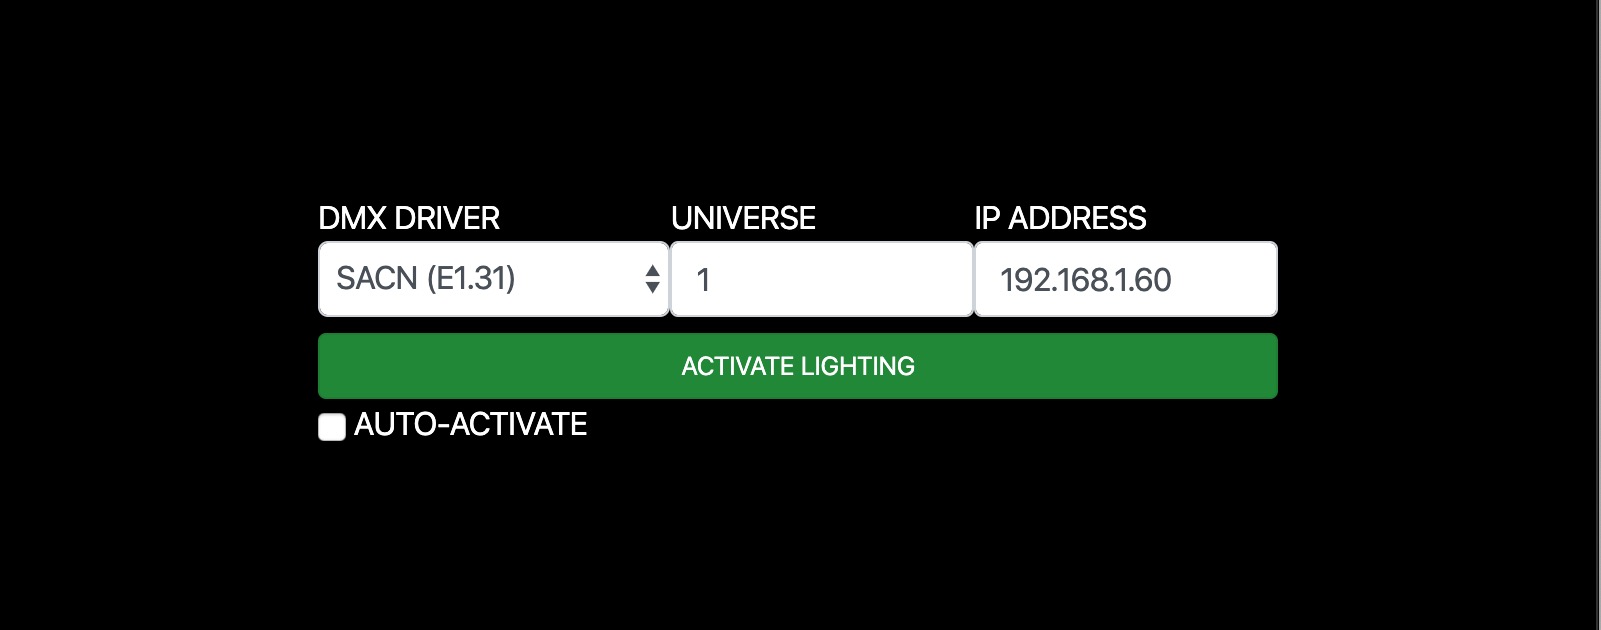 If you choose "ARTNET" or "sACN", you'll have to type the IP Address of the controller into the field on the right.
In the middle, you can specify what universe number you want to operate in. DMX controllers can be assigned different universes, allowing you to access more than 512 DMX devices at the same time.
Click the activate button, and your lights should respond. You can also check "Auto-Activate" which will make your lighting automatically activate with whatever settings you used last.
How can I best use DMX?
I won't tell you how to set up your DMX system, but I can give some suggestions.
-
Be generous with tags. You want to make sure that you have enough granularity to be able to control whatever lights you want. You don't have to just use the "main" and "accent" tags.
-
Take advantage of macro buttons for special DMX devices, like smoke machines. That allows you to fire off a burst of smoke on-demand with a single press of a button.
-
Don't have all of your lights be colored the same. Use tags to vary what lights are colored and what lights are white so you can have good visibility and good accent lighting.
-
Feel free to create multiple DMX Configs and change them mid-flight using the lighting core or a macro to change the mood at certain times during the mission.
-
Use Triggers to have your passive lights automatically respond to things that happen with the active lights. For example, you could have strobe lights that only turn on when the "shake" effect is active by creating a trigger that turns them on when the "Lighting: Shake Lights" macro is run and turns them off when the "Lighting: Set Effect" macro sets the lights to anything other than shake.
Troubleshooting
Are your lights not working? Try these tips:
- Make sure you assigned a DMX set to a set config, and then apply that set config to your simulator when you star the flight.
- Make sure you chose a DMX Config from the dropdown on the lighting core.
- Is your DMX controller configured correctly? Check with the manufacturer for instructions on how to set the universe number, IP address, and input/output mode.